Saturday 31 July 2010

Chamomile Soap Cakes & Sleep Pocket Pillows


This is soooo quick and easy, yet brilliant!
Chamomile soaps made with silicon cake cases...never going to buy soap again!


We picked chamomile from the garden and dried it last week.
You can use chamomile tea bags or whatever you want;
dried rose petals, lavender, etc
Then put water from the kettle in a jug to cover the flowers.
Let it strain for a bit.


I bought a block of glycerine from here on Ebay.
It comes with instructions on the screen page there.

Cut it into blocks, put in a glass jug and microwave with cling film on top for 1 min.
Then add some chamomile tea/ strained water, stir. I added a few drops of lavender oil too.
 Pour into moulds.
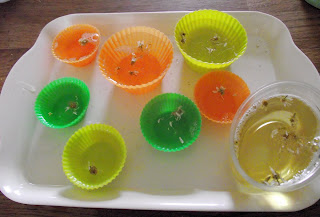
Poke some dried flowers on top. 
Make sure you press them into the soap,or they will flake off when dry.


Here are the cake moulds and an old yoghurt pot.


Here they are when dried. It took about 2 hours to dry!
Brilliant!


I made him a sleep pocket pillow from some leftover dried flowers.
He dyed some cloth like we did here with the blackcurrants.
Then I sewed his initial and put some flowers in the cloth he dyed and sewed it up like a stuffed pillow.
This will go on his real pillow tonight...I love his night sky dyed bamboo pillow.
We got it from Holdens Landing who is truly an amazing artist with bamboo velour!


We tied another piece of dyed cloth around a glass with ribbon and filled it with yellow flowers,
to go alongside the blackcurrant dyed one.

And of course, there is plenty left for chamomile tea!
Little Seed is having this today because he is teething poor little man.


abc button

Monday 26 July 2010

5 Things To Do With Blackcurrants In A Day


We have had so much fun today with just 400g of blackcurrants.
We picked these from our bushes but you could buy a couple of punnets and do exactly the same.

No.1: Make fabulous blackcurrant jelly


Easy too:
Put 400g of blackcurrants with top stalks removed, into a pan with a dash of water.
Heat until simmering NOT boiling for the juices to be released.
Press down with a spoon in the pan.
Strain and return liquid to the pan, add 50g of sugar.
Heat until dissolved. Soak 4 gelatine leaves in a bowl of cold water for 5 mins.
Add the leaves to the warm pan and dissolve. Add half a cup of water to bulk it up.
Pour into desired moulds.

Delicious and oh so cute!
Great instead of jam on toast.

Important: Now take all the fruit bits discarded from the jelly recipe and add
about 2 cups of water. Bring to the boil and strain.
Retain the mixture for the following ideas.

No.2 : Make blackcurrant playdough


This takes 2 minutes and the recipe is from Minieco.

No.3: Dye a T-Shirt and some cloth ( or whatever cotton thing you want)


Soak what you want before in half a cup of salt and  enough cold water to cover.


Remove from the salt water.
Add half a cup or more of the blackcurrant juice.
Then rinse in cold water and dry on the line.

No.4: What to do with that piece of dyed fabric that's too nice to waste?


Wrap it around a glass and tie with a matching ribbon to make a vase.
He had to hunt in the garden for some flowers that were the same colour as the cloth.
We put this on our Summer Table.


No.5: Use it as watercolour paint


It then dries a purple-blue colour.

x

If you have anymore ideas I have a glass of the stuff in the fridge.
Was thinking of natural food dye for biscuits and icing sugar.


abc button


Sunday 25 July 2010

Anything Goes Ice Lollies

The rain inspired more water based activities:
fabulous ice lollies.


Big Seed's friend Little Elf came to play and his mum suggested yoghurt lollies!
What a great idea. So we put strawberry yoghurt into a lolly mould.

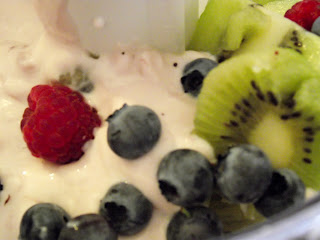
Then we got creative and put some yoghurt in a blender with some fruit from the garden.
We made a few of those too, and some juice ones.


His favourite was this....water : pure and simple.
Take this out of the freezer after a couple of hours ( not too long) and you will see some ice crystals,
and amazing shapes. It's not very clear in the picture,
but it's really great in reality.


When you get bored of it...as a 3 year old will...
watch it melt, or drop it on the floor outside and see it shatter.
Very entertaining.


Saturday 24 July 2010

Watercolours # 3 : Inspired by the rain

The school summer holidays have started and so has the rain...of course!
Rain, rain, rain...so we just rolled with it.

We took some proper watercolour paper and dabbed it all over
with watercolour tube paints, straight from the tube itself.


Then we laid it on a wire cake rack and placed this on the step in the rain and watched
the colours change and merge together.
Big Seed was really absorbed watching it.


He got really excited going in and out of the rain to check on it constantly.


Here is the finished picture.


Bare feet on the wet steps...a new exciting sensation.
He loved this!
I had to put a towel down by the door as he kept going in and out enjoying himself.


 I had to extend this quickly...so we used felt tips on kitchen towel in the rain.


Then we reached a real milestone...Big Seed spontaneously came up with an art idea
and got to work on it without any assistance from me.
He got some paper and made lots of dots with a green pencil,
"This is raindrops. This is the rain!"


Then he cut it out and stuck it on the cupboard door.
As the weather changes he now feels the need to draw it and hang it on his washing line...  ( oh yes, the washing line is still going strong!)
...we have a sun, grey and white clouds and a moon.

For me this is the most significant art work he has ever done...all by himself, for himself.


Tuesday 20 July 2010

Salt Dough Beads

Big Seed is really into his beads so we decided to make our own:


Here is the necklace he made me.

What was important for me was to let him make lots of mistakes,
so he could really learn from this activity.
By this I mean, let him make beads that are too big and too small,
holes that do not work, etc.


Here is the recipe I used:

1 cup of salt
1 1/4 cup of water ( although I did need to add extra)
3 cups of plain flour

( bake at 200 F )

I showed him how to make balls and discs, then I let him get on with it.
He used the end of a big paintbrush to make the holes.


We baked them and when cooled he brushed them with poster paint...
until he had a better idea!


He painted his hand and then rotated the beads in his hand!
Brilliant!


Of course just dunking them in the paint pot is easiest of all!
I wiped his hands in-between colours.


Here is his rainbow collection.
We didn't varnish them.


I made him a salt dough bowl for those he couldn't thread.
He sells them in his toy shop. How can I resist buying those?


Here he is proudly wearing his beads strung with rainbow wool.
Needless to say we all have a necklace.


He turned my art washcloth into a work of art too!

x

If you like baking with kids you will like my next giveaway coming soon sponsored by CSN.
CSN Stores has amazing online stores where you can find everything from cookware to ceiling lights to furniture!


Sunday 18 July 2010

Winner of Gnome Giveaway and Blog Awards

It is giving fever here at Two Little Seeds.

First up is the winner of the Summer Gnome Giveaway:

Congratulations to Elizabeth!!!!
Thank you everyone who entered.

Please contact me with your details so I can post the gnomes to you...
all the way to the otherside of the world.
They have their passports ready and are excited to make their first trip abroad!


Secondly I was lucky enough to receive a blog award from the lovely


Here are the rules:
Thank the blogger who awarded it to you.
Sum up your blogging philosophy, motivation, and experience using five (5) words. example: WRITE HEART PEOPLE LIVE HAPPY
Pass it on to 10 other blogs which you feel have real substance.

My 5 words would have to be.... CREATE, EXPERIENCE, LEARN, HOME, LOVE...( I really need PLAY too.)


Here are the other 10 blogs:

(If it wasn't for the first 2 blogs... this one wouldn't exist.
They have been very inspirational to me.)


Why not stop by at some of them if you haven't heard of them before and find some new inspiration?

x


Friday 16 July 2010

Say It With Buttons : A Photo Frame Gift


It was Grandma's birthday so Big Seed made her this lovely gift 
of a photo frame decorated in buttons to match her living room.

You need a flat frame, then prime it with white poster paint mixed with glue.
That takes a while to dry, then go crazy with buttons.
I bought a couple of mixed bags from Ebay.
What a co-incidence that Big Seed's aunt should send him some old buttons and necklaces
as a surprise package that morning!

I like the way that some of the buttons overlap the edge...
also to add that extra zing, layer some of them up.

Hope she likes it tomorrow!

By the way...make sure you enter Our Summer Giveaway...if you like gnomes!


Thursday 15 July 2010

Clipboard Treasure Hunt


This game can be played indoors and out.
It's been raining today, so this was a good game to play
in the wet garden in-between showers.

There is Big Seed running off with his clipboard to play this 
 kind of eye-spy game with pictures to cross off. 


Now please don't judge the quality of these drawings -
I had to draw these in 2 mins with a wriggling baby on my lap!
I also want to show that you don't have to design and print everything on a computer.

It started with a flower hunt idea- find the colours...but I ran out of crayons,
so I drew some garden stuff like washing line, sandpit, etc.
This picture above is completed.


It started to rain, so I drew a game for him to play indoors -
with pictures of his toys and household objects.
I tried to draw things that are found in different rooms.

If you need to do chores or need 5 minutes peace - draw things that belong upstairs!


Have you entered Our Summer Gnome Giveaway?

Tuesday 13 July 2010

Enormous Splatter Picture


Inspired by The Artful Parent and Jackson Pollock we made huge splatter pictures.
Big Seed really enjoyed this.
Above is the flat canvas I attached to the end of the paper so I could keep this.
This is really cheap from The Range or Wilkinsons in UK.


I love this picture...combines the garden and painting.

I taped lots of big sheets from my husband's office together.
You can use a roll (from Ikea) or a sheet.
I put 3 poster paint colours in pots, watered down a little,
and gave him a brush, a spoon and a stick.

He liked pouring it the best ...he thought that was really great,
I suppose because that's something we don't ever do.


I can also see the shapes he had made out of wool yarn on the grass.
The garden is so great for big stuff!

But you know what he liked the best?
Now his feet were covered in paint so I brought a bowl of water and a cloth
to wipe him...
he loved dunking the cloth and splattering that about the best!

Oh well....typical eh?


Monday 12 July 2010

Sun Paper Silhouette Game

After reading numerous posts on Sun Paper recently,
we made our own floral and leaf prints with it...


 and turned it into a game for Big Seed.

I bought my Sun Paper from here in the UK.

Then wrap the flowers and leaves in clear sticky wrap,
which you can buy from the supermarket.
You could probably laminate leaves but flowers are too bulky.


Have fun matching!


Sunday 11 July 2010

Alternative Breakfast : Fried Asparagus Rolls & Egg

It is always a big personal achievement if I can get
my son to eat anything green!


This is a simple recipe from this book:

We Love Food

which we are currently using.
 It has a chapter on breakfasts which is really useful as I use
this recipe as a good filler for about 10am.


Here's how:

1. Cut the crusts off some wholemeal bread slices ( not granary..it won't roll).
2. Boil some asparagus. It is best to cook for a few mins but my son loves his veg really soft, 
so I have to cook things longer.
3. Let the asparagus cool then roll it from corner to corner in the bread square.
I found it helped to put a cocktail stick through to keep the shape.
4. Fry it in oil.
5. Cook a runny egg for 3 mins in simmering water.
6. Slice off the top of the egg and dip in.

He actually said," Ooh this is nice, will you cook this again!"

A green vegetable...I nearly fell off my stool! 


Thursday 8 July 2010

How To Make A Wool Needle-Felted Mushroom

I looked all over the internet for a tutorial for one of these and couldn't find one.
I have to thank the lovely Amanda from By Hook and Thread blog who
emailed me instructions on how she made hers.


This is the first time I have tried needle-felting and it turned out quite well.
Big Seed seems to like playing with it.
This one is a little big though, he tries to use the top as a hat!


Wind your wool around a cardboard tube.
Use your special needle-felting needle and stab the wool at an angle.
Make sure you don't let the needle touch the tube or it will break easily.

I bought some white wool tops/roving from here at Handmade Presents in the UK.
Katrin at Handmade Presents is kindly offering readers 5% off a wool order if you mention this blog,
as long as you mention it in the message column of your order.


If you feel confident you can use 2 or 3 needles at a time.
Once it is sturdy, stick a ball of ordinary wool in to make it easier to felt with several needles.

Edit: Amanda says, "Just a little tip, before you wrap wool around the tube, pull it apart and lay some across and some down to cross the layers. It helps the scales of the wool to attach together in the needle felting process."

Here is the finished stalk.


Then find a bowl the appropriate size for the mushroom cap.
Wind the white wool around the bowl as you do for the stalk.
I then took some red wool torn into long strips and attached it to the top.
You can see some faint gaps on top as I didn't have enough red wool to be honest.
You can use all red wool if you have it and omit the white wool part.


For the spots, take a small amount of wool and roll it into a flat ball.
Place a cushion on your lap and stab it with the needle, turning it over several times,
until you have the desired spot.


Attach the spots to your cap.


Pop your cheeky gnomes inside, and put the cap on.
A new home for your gnomes!


Most importantly make it in secret in the evenings, then
watch your child's face light up in the morning when they discover the new arrival!

Speaking of gnomes...have you entered our Summer Gnome Giveaway here?


abc button


Related Posts Plugin for WordPress, Blogger...